 Fast MPEG audio editing
mp3DirectCut
Tutorial: Cut & Fade - Proper cropping of MP3 tracks
One of the main purposes of mp3DirectCut is to quickly isolate tracks from mixes, radio streams or raw cut files. This tutorial shows, how to cleanly cut out an MP3 track and polish its edges by fading in and out.
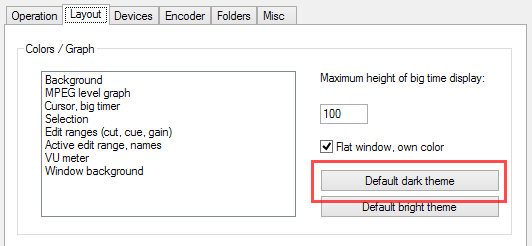
Note: This tutorial is based on mp3DirectCut version 2.22 and the "new" dark layout theme, which can be activated in the settings. Of course all the functions also work in the classic layout, even if some buttons and fields may be at different positions.
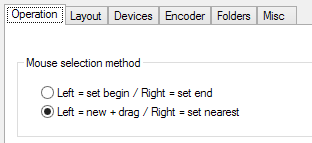
Also it is assumed that the "Mouse selection method" is set to its default "Left = new + drag / Right = set nearest".
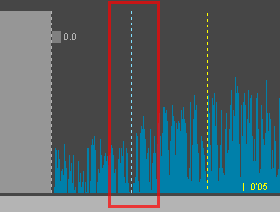
The zoom level should not be too "far". Second zoom out step from the nearest view is recommended.
Open an MP3 file. Information is shown in the status bar at the bottom, the track length is shown in the main button field after "Total". AAC and MP2 files can be cut but not faded, so for this tutorial it's best to concentrate on MP3.
At any time you can listen to the current state of the edited track. Press the Play button or the Space key. Navigate along the track with the scrollbar or the "Map bar" below the MPEG graph.
Now find the position where your new track shall begin. Click into the MPEG graph at this position with the left mouse button.
To remove everything before the beginning, let the selection begin at the start of the loaded audio. Move to the start of the audio with the "Go back" button besides the Stop button OR with the Home key. Then press the selection button "Set begin" (down on the left) OR with the right mouse button click into the space before the beginning of the audio. The light blue selection should appear.

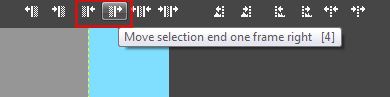
To find the best position where your new track begins, you can adjust the end of the selection: either with the right mouse button, or with the fine adjustment buttons of the tool bar on the top - or the corresponding keys 3 and 4. To prelisten the track beginning, jump to the end of the selection with the "Go to end of selection" button or with the arrow down key. Alternatively you can directly prelisten from the end of selection with the button "Prelisten region FROM END of selection".
Make sure that the selection really begins at the very beginning of the audio. Then press the Cut button (or c or the Del key) to remove the selected range.
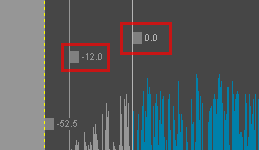
If the track beginning doesn't sound satisfactory, a slight fade in may help. Note: fade in should be used more carefully than fade out. Where the fade in shall end, point into the graph with the left mouse button.
In the Edit menu select "Simple fade" or "Two stage fade". With more steps, smoother fades are possible, so we choose Two stage fade.
The function has created two edit points and a pre-defined fade in. (Note: You can create as many fade steps as you want by simply adding edit points with left click and "Cut"). Now you can adjust the gain of the beginning and of the step in the middle: Drag the small gray handle/rectangle with left mouse button up or down. The current gain is shown in dB besides the handle. Don't touch the last/third edit point as it would affect the whole track. (Note: The pre-defined silence level can be adjusted in the settings under Misc/"Lowest gain".)
You can also adjust the positions of the gain changes with the right mouse button. Don't forget to prelisten the edited range. Note: If anything went wrong, you can undo the recent step(s) at any time with the Undo button (toolbar on the top) or Ctrl+Z.
Now let's crop the end of the track. Jump to the end of the whole audio with the "Go to track end" button or with the End key.
Create another selection by setting its end to the end of the audio.
Now search the position where the new track shall end. Press the right mouse button into the graph there. Alternatively you can press "Set begin" to let the selection begin at the current play position (yellow dotted line).
Fine adjust the track end by moving the selection begining - right mouse button or fine adjustment buttons (toolbar) / keys 1 and 2. Prelisten the position with the Prelisten buttons or by jumping to the selection beginning and Play. Then press Cut (or the Del key or c) to remove the area.
If you want to create a fade out, left click into the graph at the position where the fade out shall begin.
Again choose a fade preset from the Edit menu. For smoother results on fading out, "Two stage" is recommended.
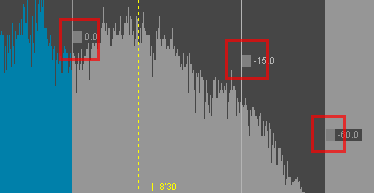
Adjust the gain and the position of the fade points (right and left mouse button, see above). Tip: Don't create too long fades. Usually 5 to 10 seconds should be enough for fading out. And keep in mind, that fades created without re-encoding are less acurate as if they were done with a PCM editor. mp3DirectCut can only fade in steps of 1,5 dB. Always prelisten the edited range!
Again check beginning and end of the cropped track. Then save the file under new name: File menu / "Save complete audio...". Before closing the window, it is recommended to open the saved track in a new instance of mp3DirectCut or a player software to ensure that everything has been created and saved correctly.